Restoring Lionel Prewar Trains: A 514 Ventilated Refrigerator
by Bradley Kaplan
Restoring toy trains can be a fun project. As a general rule, do not restore a toy train thinking you will make a profit on it; you rarely ever will. A restored train has the value of a non-restored piece in good condition. Restoring a piece to a rare color scheme obviously will not make the piece worth anymore money than the non-rare color scheme. In fact, if you have a piece in good condition in a rare color scheme and restore it, chances are it will loose significant value.
If you will not enjoy restoring a piece, then you are probably better off not tackling the project. MTH and JLM Trains make excellent reproductions of Lionel, Ives and American Flyer prewar toy trains. You can often pick up their pieces well under market value. I acquired a mint MTH 513 Standard Gauge Cattle Car on E-bay for $75. To get an original Lionel 513 in good condition, plus parts and paint, would end up costing more than $75 (the retail price on the MTH 513 is about $120).
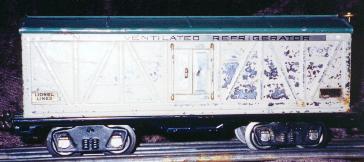
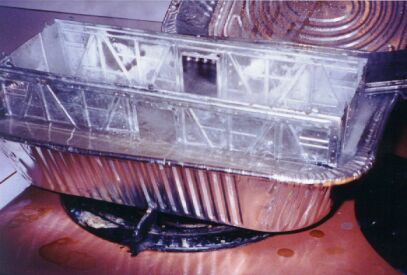
In this project, we will restore a Lionel Standard Gauge 514 reefer. It was produced in 1927 and 1928. After 1928, the number 514 changed to a box car and the 514 reefer became 514R (the brass number tags changed from 514 to 514R as well). Other than the numbers changing and variations in paint and brass/nickel, the two cars are identical. The 514 reefer is rarer than the 514R. These restoration steps apply to virtually all Lionel prewar tin plate trains.
The first step in restoring your toy train is carefully taking it apart. On most Lionel freight cars, the roof snaps off. This would be the first piece you remove. Then you would remove the trucks. The trucks, depending when manufactured, may be installed with either a cotter pin or a lock washer. Carefully un-bend the tabs holding the brass (or nickel) pieces and the miscellaneous trim (such as door rails). Bodies of box cars are usually put together with tabs and welded. Do not attempt to take the entire body apart. There is no reason. You will take the body off the black frame. Sometimes, you may need to use a razor blade to get under tabs. Usually, a screw driver and a good pair of needle nose pliers works well.
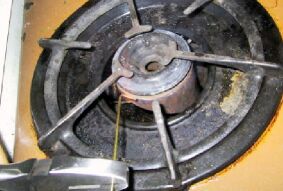
Look at the trucks. They may not need to be restored. If they do, carefully bend the truck frame so the wheels and axles will pop out. If there is a cross bar on the truck, there is no reason to remove it. Just leave it alone. Even the though the cross bar is unpainted, no one will ever see it and the easiest thing to do is just paint it.
Now comes the time to remove existing paint. There are three ways to accomplish this:
- Glass Bead blasting (sand blaster);
- Boiling the item in laundry detergent;
- Using paint stripper.
Glass Bead blasting is the easiest and most fun way to remove paint. If there is any significant amount of rust on the piece, it is definitely the best choice. Glass Beads are just a fine powder that is used in a sand blaster. Use the lowest pressure possible on the sand blaster machine that will remove the paint/rust. Even though glass beads are a fine powder, you can damage a train part with too much pressure. Be careful!
Boiling a train in laundry detergent is one of the strangest ways to remove paint; tell the salesman at your local paint store and he will scratch his head in disbelief. However, this is one of the most effective ways to remove paint. It only works on lead paint. If the item has been repainted already, this method probably will not work. The detergent must have “anionic” and “nonionic surfactants” to remove paint.Tide and Fab are both good choices. You simply need a large pot of water and a couple cups of detergent. Bring it to a boil, then put your train parts into it. Within five minutes to an hour, the paint will come off, sometimes, like a sheet of paper. Trucks maybe chemically blackened and this method will not work for them. If you do not have a sand blaster, you may have to use paint remover for the trucks even if detergent works fine for the rest of the train.
Using paint remover is the last, and least desirable, option. It is a very messy process. You are dealing with toxic chemicals so make sure you wear heavy gloves. Plan on doing a lot of scrubbing with this method.
When the paint is removed regardless of the method (even if you used the detergent method), wash the pieces off with soap and water. Keep in mind that, once the piece is wet, it can rust very easily. The quicker you dry the piece, the better off you are. The best method is to put the pieces in the oven you will later use to bake the enamel onto the train. This will quickly dry the pieces.
The next step is to look at all your parts. Straighten out any pieces of metal that require it (later, an article will be added on how to repair damaged metal with Bondo). Find a good metal polish to clean off your brass and nickel pieces. They should be able to be shined to look brand new.
Now is a good time to figure out what parts you do and do not need. With some care, most brass pieces can be straightened. You can find reproductions for virtually any part that Lionel and other train manufacturers have made; even brass number boards. Often, replacing the couplers is a smart option. A good source for parts is George Tebolt. Your parts dealer may also be an excellent source for paint. The parts dealer should be able to provide you with help on any specific questions you have. After all, it is their business. They should be able to tell you the appropriate color paints for any paint schemes you would like.
The next step is to start re-painting the pieces. The best way to re-paint the pieces is to bake the enamel. Lionel usually dipped the piece onto a huge vat of paint and hung it to dry. As a result, you will see drip marks on original pieces from the factory. Lionel, and most toy train companies, never primed their pieces. When restoring, priming the piece is a good idea. Even if you are not ready to paint the piece, you should prime it once the paint is removed to prevent any rusting. I like to use Rustoleum primer on all my pieces as this will ensure they never rust. I do know of a person who does not use primer. He says that Lionel never used primer and he finds by not using primer the pieces re-assemble much easier.
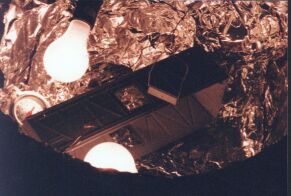
To get a good, strong finish, you may want to bake the enamel on to the train. This will also make it glossier. The best method for this is to take a wooden box, wire two light fixtures into it, place two 60 watt bulbs in to the fixtures, line the box and its lid with aluminum foil, and put an oven thermometer into the box. You want to bake at between 150 to 250 degrees (depending on the paint). You can control the temperature by opening the lid to various degrees. Primer paint usually bakes on fine at higher temperatures. If you bake your enamel at too high a temperature, it may bubble. You may want to test a new paint with a sample piece of metal if you are not sure how hot to bake it.
Do not use a regular oven. The oven will smell too much after you bake the enamel on. Do not use your toaster oven either. The temperature on a toaster oven is on a thermometer that will heat up the coils, shut off, then re-start again.
To apply the paint, either use spray paints or an air brush. For an air brush, an excellent source of paint is to go to a car body shop and have them paint match the original color. There are companies that supply paints to match Lionel colors (as previously mentioned, your parts dealer should have excellent color matched paints in cans and spray bottles). If you go to a hardware store, you will find that their are some very good, or identical, matches to the paints you need. For example, most black paint Lionel used was “safety black” and most glossy black paints are perfect matches. For the 514 body, Rustoleum Almond is virtually an identical match for the Ivory paint Lionel used.
Primer paint will usually dry very fast when baked; usually in under 20 minutes. Regular enamel drying time in an oven can vary from ten minutes to three hours. You can always do a test strip of paint on a piece of metal if you want to experiment. Usually one coat of primer followed by two or three coats of enamel should do the trick. You should either apply coats within an hour of each other, or wait more than 24 hours between coats. This is very important rule to follow.
Now that the painting is done, it is time to put the car back together. You should really wait a week after your final coat of paint before you begin assembly. This will give the paint enough time to harden. This is especially important when putting the roof back on.

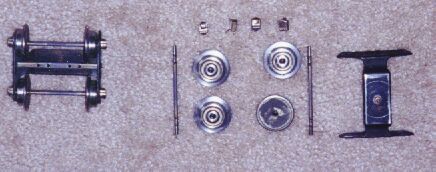
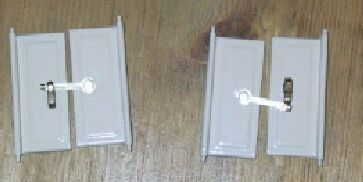
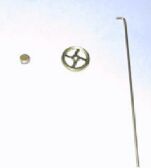
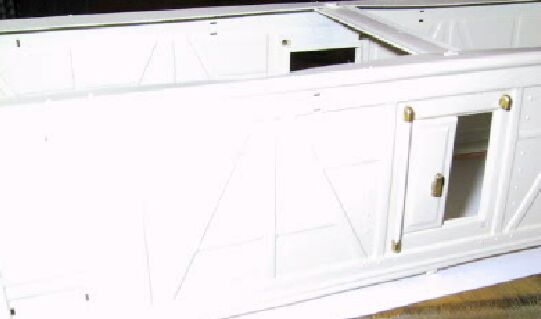
You should, first, lay all your parts out on a table. The 514 reefer has a lot more pieces than most other Lionel cars. This is due to its doors, their hinges and latches. In the photo of the parts, the trucks are already reassembled. For this project, the following reproduction parts were used:
- 2 couplers;
- 1 brass rod (for both brake wheels);
- 2 brake wheels;
- 2 brake wheel caps;
- 2 latches (one for each door);
- 2 latch rivets (almost impossible to reuse the original).
All other parts were able to be reused. Reproduction brass and nickel identification tags are available. Usually they are stickers instead of the proper material, but they look fine.
The first step in re-assembly is putting the couplers onto the frame. For standard gauge trains (that use latch couplers), each coupler involves three pieces: The coupler itself, triangle coupler holder and a pin. The bottom of the pin mounts in the triangle holder and the top of the pin goes into the frame of the car. The coupler is held in place by the pin. The triangle coupler holder has tabs that are bent down on the frame of the car. The best way I have found to bend these tabs down is to put a piece of paper on top of them. Push the paper down so the tabs break through the paper and are exposed. Then just take a hammer and bang the tabs down. On the 514 reefer, it is not important that this comes out perfect since the tabs will be hidden inside the body. On other cars, it may be more important since the tabs may be exposed.
The next step is to put the brass pieces onto the doors. The hinge rivet (which will always be a reproduction) can either be riveted in or glued in. The latch holder will be installed exactly how it was before the restoration process began. You have to careful re-bend the tabs back to their original position.
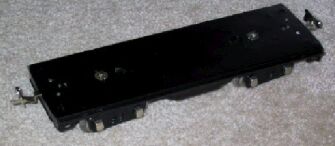
The next process is to put the trucks back onto the frame. They go on exactly as they were removed.
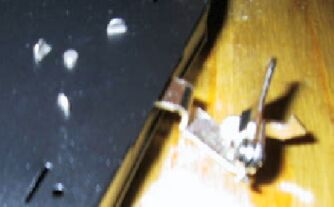
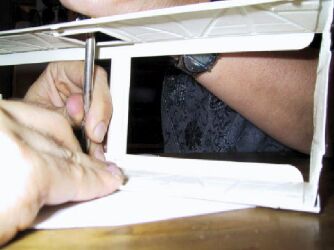
Now, if you were unable to salvage your original brakewheels, you will have to put your new set together. There are two options for reproductions: Option 1) Buy the breakwheel and brass rod already attached (this is the easier option and it looks close to the original but is not an identical match); Option 2) buy a brass rod, brakewheel and brakewheel cap and put them together. I always go with Option 2. The brass rod for the brakewheel needs a 90 degree bend on it. The 90 degree bend then lays perfectly on the brakewheel and then the brakewheel cap goes over it. The brake wheel cap’s tabs must be bent down to hold it together. The only tricky part about this is the 90 degree bend in the brass. If the inside of your bend is not as tight as required it will not fit on the brake wheel properly. If you bend it to the proper tolerance, the brass rod will break.
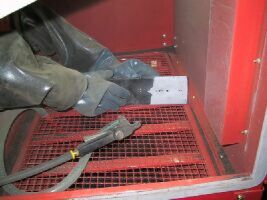
To avoid the brass rod from breaking, you will have to first bend the metal on what will look like a 90 degree angle. Then heat it with a stove or propane torch until the metal is glowing red. Holding it in pliers or a vice, use a hammer and bang the top of the bend (the photo does not pick up the flames from the stove, but you can see the tip of the rod glowing red).
The next process on the 514 reefer will be to put the hinges on to the body. It is best to install the top half of all four door hinges first. The top half of the hinge, due to the body design, is more difficult to install than the bottom half.
Therefore, we are installing the top half first because the second piece of the hinge has to be installed with the door. The hinges must be tightly attached to ensure proper operation. This is best done with two people; one holding the hinge in place, while the other pushes it down with a screw driver or similar device.
The next step is to install all the brass or nickel pieces such as the number tags,ladders, the stanchions to hold the brake wheels on (but not the brake wheels), and the ventilated reefer sign. Bend the brass pieces just enough to hold them into place. This makes it easier and less likely to damage if the piece needs to be restored again in the future. Make sure to put all the pieces on in the right direction. It may help to have a picture of the piece in front of you before reassembly begins. Also, be very careful not to scratch your paint job.
The next step is my least favorite: Reattaching the roof. If you did not let the paint dry at least a week (as previously mentioned), stop now. As you know from its removal, the roof is a pressure fit. If the paint is not fully hardened, it can start to peel off when you put the roof on. You will have to carefully force the roof in place. This step is done before putting the body on the frame because putting the body onto the frame is a lot easier then putting the roof onto the body and you may have to slightly bend the body with your fingers as you are attaching the roof.
Now, you are ready to install the body onto the frame. If the body tabs do not fit perfectly into the frame, put a screw driver behind them and stretch them into place (since the metal is slightly flexible).
The last step is to put the brake wheels into place. I just drop them in. I do not bother crimping the ends.

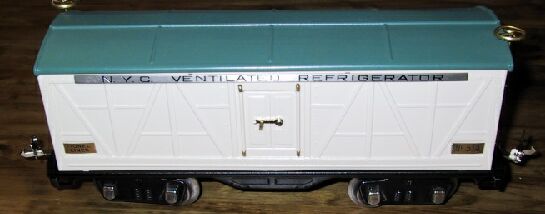
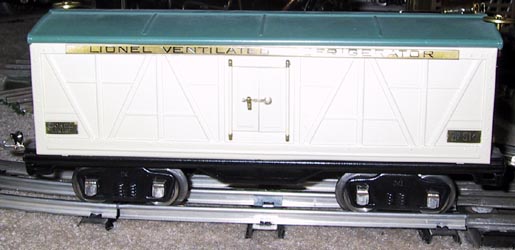
Here is the finished product. The NYC Ventilated Refrigerator tags are MTH reproductions that came with the piece when it was purchased [the correct tags say “Lionel Ventilated Refrigeration]. The only reproduction tags that are currently available with the Lionel name are stickers so I elected to keep the MTH version.

Here is the 514 with a 512 and a 517 that are restored in a similar manner.
UPDATE SINCE THE ARTICLE WAS WRITTEN.
I got the tags that say “Lionel Ventilated Refrigeration” at from a parts person. These are originals that the parts person salvaged from a scrap piece.