Lionel Pre-War “Factory Samples”
by Paul Pullen
For several years, a friend of mine has been accessing some old pre-war cars, and wanting them to run with his post-war Lionels, so he has been re-equipping them with post-war trucks, and has passed the old pre-war trucks (and couplers if they still had them) to me. This left me with several sets of old post war trucks in a drawer with “nothing to do.”
Recently, on the Toy Train Membership List, there has been a thread about my first Lionel train. Well, in all reality, I could write about mine, but all I could say was that the engine still runs, and is still in my possession, but the rest of the train has been rebuilt so many times that you would never recognize it. As a teen-ager, I tore apart all of my old Lionel cars, tossed the frames and bodies, and built up from the trucks in wood. All of these cars are still in existence. I repainted the old 2-4-2 engine my brothers and I received for Christmas in 1954, so I don’t even know its original number.
Well, back to the trucks. They have been sitting in a drawer where I have spare trucks stocked. One set of them went onto a pre-war Lionel lithographed Gondola that this friend gave to me when he received it from another operator minus trucks and couplers. As a result, this Gon is running again with original trucks and has repro-couplers attached.
I still had two sets of trucks sitting in my parts drawer. What could I do with them? I thought about this, and in honor of Lionel’s 100th anniversary, I decided to produce a “Pre-War Factory Samples” from these trucks. Now the question was what it would take to do this job. They had to be made from mostly metal, to go with the tin-plate that Lionel used during the 1920’s and 1930’s. So I started brainstorming.
In order to do metal work, I had to assemble the proper tools. That is the key to this. I had to build a metal brake to form the chassis and the body sides, door guides, etc. How was this to be done? I bought a 2×4 sign scrap from Hechinger before they went out of business, a short piece of shelf bracket that was formed in a 60 degree angle, a piece of 1 inch L shaped aluminum. I had two types of tin snips to do the cutting on the metal for the frame and body. These made up the main tools that would be necessary to “build” the “factory samples.”
For the roof and roof supports, I used wood. I have been given a piece of milled roof by a friend who scratch builds custom cars for Lionel here in the Baltimore area. I used this mounted on a ends made from ½ inch plywood.
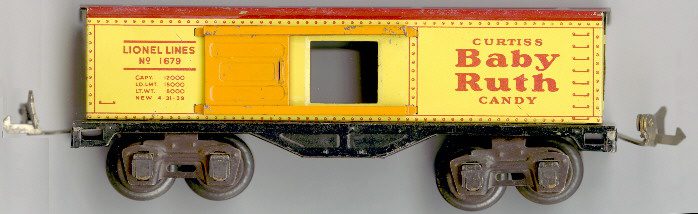
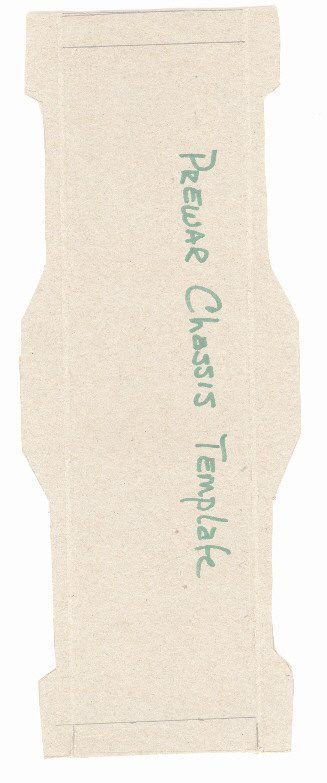
The “factory samples” are based on the Lionel 1689 Baby Ruth car pictured here. From this car, I constructed a template for the chassis out of cardboard to trace onto the aluminum. The aluminum I used is left over from some work done on the exterior of our house. When the contractor was working on the house, he purchased aluminum from Home Depot, and had some left over. I kept it for general purposes, which at that time I did not know the actual reasons. I guess I had this in mind at the time. I have used heavier aluminum that came from a commercial residing of a building I used to work in for a series of scratch-built cars (chassis only) for my post-war Lionel trains. This is the first time I ever attempted body work.
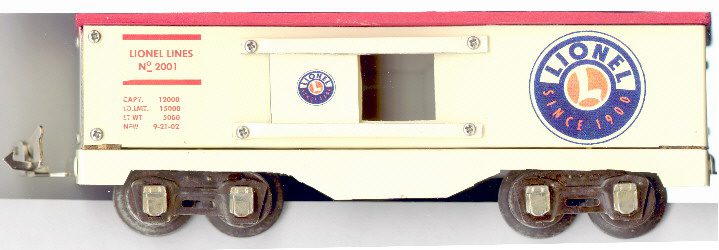
Once the car were laid out on the inside from the template shown, I used tin snips to do the rough cut-out, and a nibbling tool to do the fine cutting. After forming the chassis, I used the metal brake to bend the sides of the chassis to create the beginning form of the car. On the first car, number 2002, I drilled mounting holes for the trucks, couplers, and the end wood supports. Then I bent the end sills of the chassis into place. With this one, I put a wood sill under the chassis, and mounted the trucks and couplers on the wood. This car sits higher that my second unit does. It is strictly as Lionel would have made it–metal chassis, no wood sill.
The first car, 2002, for the year of manufacture, was physically completed in the beginning of October of 2002. At this time, I went to work to create the decals for the car. Then I decided if I was building one car, I would build a second one as well. The decals were created in several steps. Images of Lionel emblems were scanned from the latest issue of Classic Toy Trains, then cleaned up to be satisfactory for my use. I took out the “LEGENDARY” from between the Lionel Trains on the image for the car. I did not have the availability of a Lionel Electric Trains image at the time.
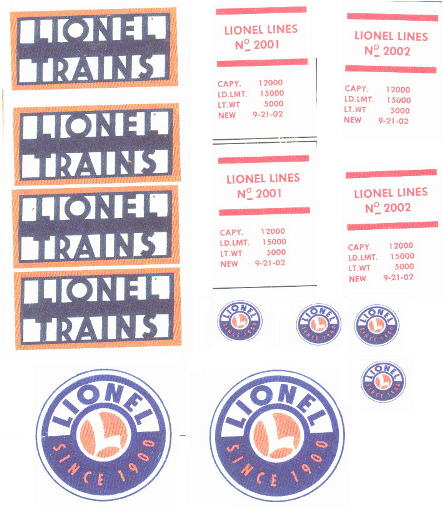
I used several packages in conjunction with creating the decals. Scanning the images was done in an old graphics package, PhotoStyler.Cleaning up the image was done in PhotoShop and PhotoPlus, depending on the machine I was using. The images were then inserted in a WordPerfect document, and the text was added. By the time I had the graphics ready to print, the document was in excess of 69 megabytes. It was not a small undertaking getting the graphics ready. Printing was done on my Alps MD1000 printer. An image with some of the left over images from the sheet of decals is shown here.
The car body and frame were made from cream and white aluminum siding, and so did not require painting once formed. The doors and door guides were also cut out of aluminum. The doors are just a small square, but the door guides were a little more because they had to be formed into a “U.” I cut a strip to the width of 3/16 inches, then put it into my portable vise for the beginning bend. That got a 90 degree angle into the guide, then I had to close the U with a piece of printed circuit board between the two sides of the U. It worked pretty well.
The wood end supports were screwed onto the frame, and the roof was glued to the end supports. One side of the car was formed with one end attached. The side was measured to fit from the door down to the chassis, where a 90 degree bend was inserted to give the side some rigidity. The door was drilled, then opened with a nibbling tool. Door guides were attached with 2-56 screws and nuts. The car was assembled with 2-56 screws holding the corners to the wood blocks.
Decals were then put on the side of car number 2002.

Car number 2001 was the second one off of the production line. It varied from car 2002 by having no center sill. This meant I needed to strengthen the chassis, so I pop-riveted the corners of the frame together. I opened a slot in the end of the car for the coupler to extend through, much like JLC did in the 1930’s. The car was then built up from the chassis, sides formed and mounted. Final work was decaling the car. This time, because I did not have the Lionel Licensed image, I just went with the enlarged Lionel “L” image wrapped with “Since 1900.” This is the same image that graces the doors on both cars.
I have enjoyed building cars since I was a teen-ager, and these were no exception. It was just done in another medium–metal instead of wood. These cars will look right at home on the Buffalo Creek Railroad while running in a consist of pre-war cars. The only difference will of course be that they look to be “brand new” as compared to the older rolling stock. But you could just imagine that they were hidden in the factory all those years ago as samples from the “What If” department when JLC was in charge and wondering “What if my company makes 100 years, what will we do then?”
Enjoy your trains!


