Behind the Scenes at the TCA Museum – Building a Hi-Rail Layout
By Roy Aydelotte 79-14175
Dedicated to Gary W. Lavinus 72-4435
Ever been to the TCA Museum near Strasburg , PA ? If you have you may have wondered who does all the work to clean, maintain, update, and enhance the layouts and displays. Simple, a dedicated team of volunteers comprised of the Education and Museum (E&M) Committee members. In the fall of each year we set up holiday decorations before Thanksgiving in the Atrium, throughout the museum, and on the layouts. Then during the Museum’s “downtime”, the decorations come down, we review the work we planned and get with it. The winter period is our busiest and almost every weekend is scheduled for work.
Our downtime occurs while the Museum is closed during January through March each winter. Discussions during the E&M Committee’s previous summer planning meeting are used as a basis for the activities. The work is accomplished predominately on weekends with some additional work done by those able to spend time during the week. Typically we may have as many as five different projects. This past winter (2005) our focus included updating the O Gauge Layout, continuing a detailed inventory of existing and new items on display or in the archives, replacing/upgrading the shelving around the Standard Gauge layout, and the perennial cleaning and maintenance of all displays and layouts. This past winter we had a foreshortened downtime with two weekends cancelled due to snow and an earlier than normal opening in March. The first weekend was consumed by taking down the holiday decorations, and reviewing our planned activities.
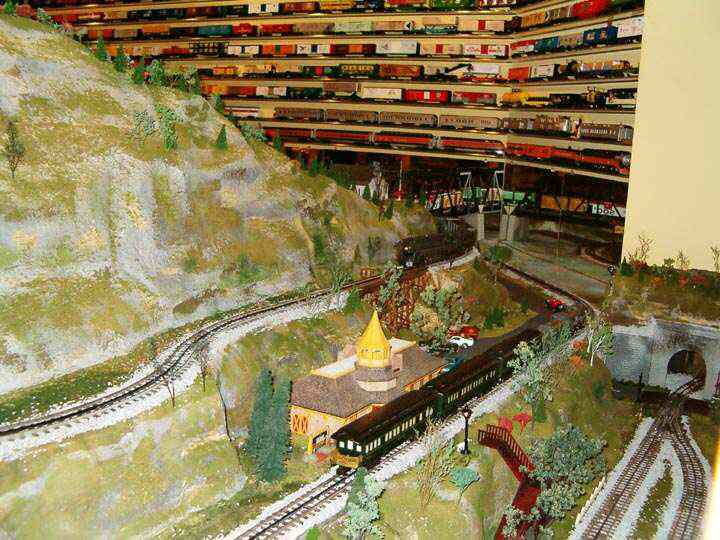
At the end of the first work weekend in January, we revisited our plan. Along with the chairman, Gary Lavinus, a couple of us walked through some basic plans for a Hi-Rail upgrade. During the intervening time since 1995, Hi-Rail layouts with their scale details have emerged within our hobby. Several committee members had wanted to evolve the O Gauge Layout to include a Hi-Rail portion for the past couple of years. As typically happens, our imaginations had to be tempered by the available space and time. Our plan was to add two loops, a mountain range, lake, bridges, trestles, and several tunnels along with various scenery items. Buildings would be scale and the scenery would include trees, ground cover, and anything else we could do to make the Hi-Rail portion as life-like as possible while staying with the three-rail track and switches. This is the essence of the Hi-Rail theme.
The O Gauge Layout last had a complete facelift in 1995. We strive to update each layout every 5-7 years as time are resources permit. In 2001 we removed the pre-war O Gauge layout during the museum expansion, placed it in the Hardware store, and replaced it with a 6′ x 11′ Rail Town loop. Much of those layout items were donated by MTH. The entire O Gauge layout is L-shaped with outside dimensions of 24′ x 24′. We operate on a limited monetary budget so various manufacturers and vendors were contacted for much of the trackage, switches, scenery, and related paraphernalia needed to turn our imagination into reality.
The museum has a “New Product Display” that is changed each year to show off different toy train manufacturers. Atlas occupied this during the 2004 season. At the beginning of our down time, Atlas informed us that the entire contents were to be donated providing us with running stock, a double wide scale bridge and some buildings. In addition to the Atlas items, GarGraves Trackage Corp donated all the track, Ross Custom Switches provided the turnouts, Z-Stuff and Miller Engineering provided automation items (yet to be incorporated), Scenic Express provided many of the scenery items, and Fred’s RR Tree Farm provided many trees. A billboard with all those donating items to the new portion of the layout may be found next to the station platform on the main level across from the Post-War Lionel O Gauge display. Donations are the backbone of the TCA Museum and we are thankful for all.
Fortunately we had some extra buildings from a previous donation that were augmented by a trip to the local hobby shop for some Lionel buildings. Since the existing Rail Town used the MTH buildings we were looking for other items to add variety. Our purchases also included the Styrofoam boards, lumber, hard-ware, and various miscellaneous items. Of course lots of sweat equity was required from committee members and a few extra volunteers. The great thing about the relatively small group of E&M Committee volunteers is we possess both a diverse set of talents and the desire to work together to get the job done. We had eight different committee members donate their time and talents along with two additional TCA members and two Kid’s Club members.
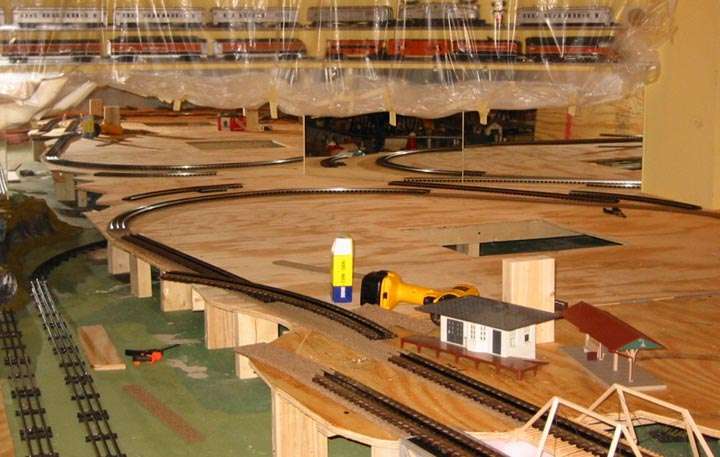
Now the fun (work?!) began. The portion of the O Gauge Layout selected was approximately 11′ x 17.5′ or 34% of the total area. First we had to remove the existing trains, buildings, trackage, and scenery that constituted the old work yard, mountain loop, and portions of the outside loop and trolley line. This chore alone took about 1.5 days with 2-3 folks supporting the effort. After a fresh coat of paint on the base platform, we began our new creation. The second weekend on this project (third in January) we again met to discuss details, identify equipment, trackage, buildings, and other items that would be needed.
Through the rest of January and most of February we built the basic layout and two elevated levels. Our challenge was that during the winter months the typical hobbyist is also building layouts. This means that donated track and switches were not immediately available due to pre-existing orders. So we had to begin laying out the trackage with templates and building the platforms prior to receiving all trackage items. By the time work on the first elevated level was progressing, all track and switches had arrived. Close timing, but we had a schedule to meet.
Each loop has a stop block to allow the trains to rest between runs. In addition a siding was placed with a corresponding stop block in front of the new location for the TCA Museum station. A bypass loop was also constructed to allow future operation of two trains on the outside loop. A new yard area was created on the Plasticville side of the mountain that helps tie the two layout styles together. All wiring was soldered under the tracks to the rails and brought down through the different layout levels to our crawl space to be connected later.
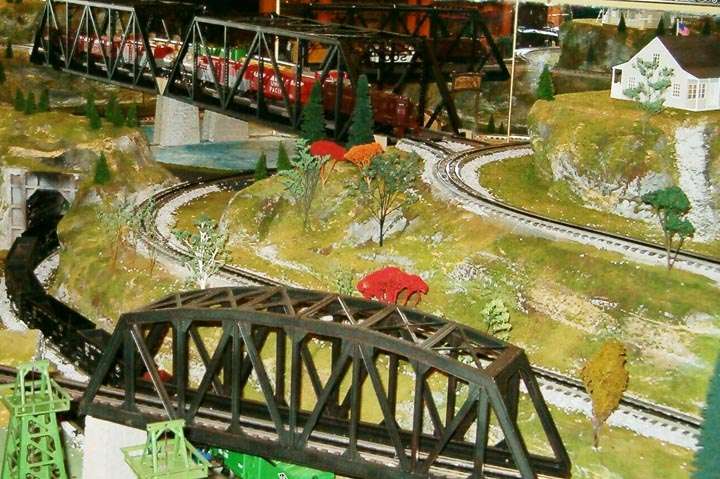
The recent Atlas donation was announced late in January and we suddenly found ourselves with a 40” long, double track trestle bridge. This scale bridge needed to be incorporated in the new Hi-Rail area. We tried several locations while in the midst of building the two levels to find a home. At one end of the new layout we had already laid out the lake. The trestle now connects the first elevated track to its mirror image across the lake. This is best seen in real life, but the effect was even better than anticipated as it appears to connect two hills across a double span of bridge over the lake (thanks to the mirror image). In addition, two cars were cut in half and placed against the mirror thus enhancing the image. Two trains appear to be crossing the bridge in opposite directions. The caboose on one and the engine on the other track are wired for lighting.
In any construction project there are always a few, ah…, shall we say awkward, yet memorable moments. Each of the levels under the mountain has access holes from below to allow for maintenance and upgrades. During the initial painting of the lake, the painter leaned back and all but fell cheeks first into the then visible access hole. Fortunately, two of us were on hand to witness and thus name the lake. One of our Kid’s club members volunteered to create the now visible sign welcoming folks to “Lake Falling Cheeks”. We do have a lot of fun behind the scenes (pun intended).
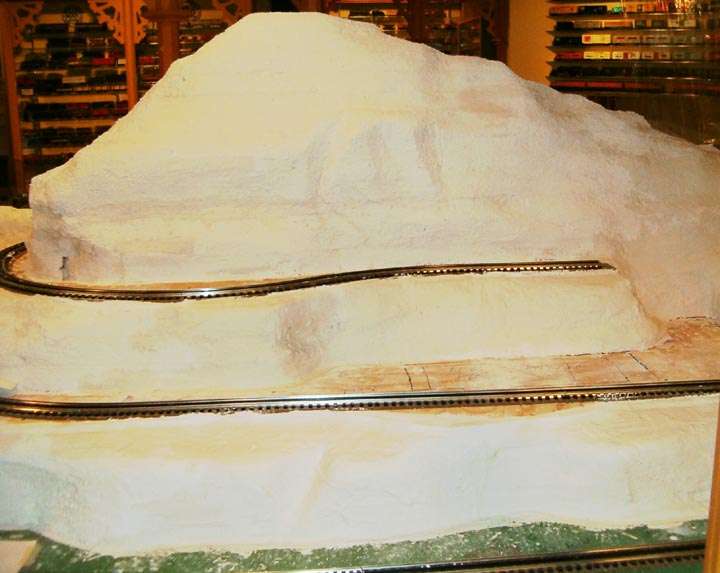
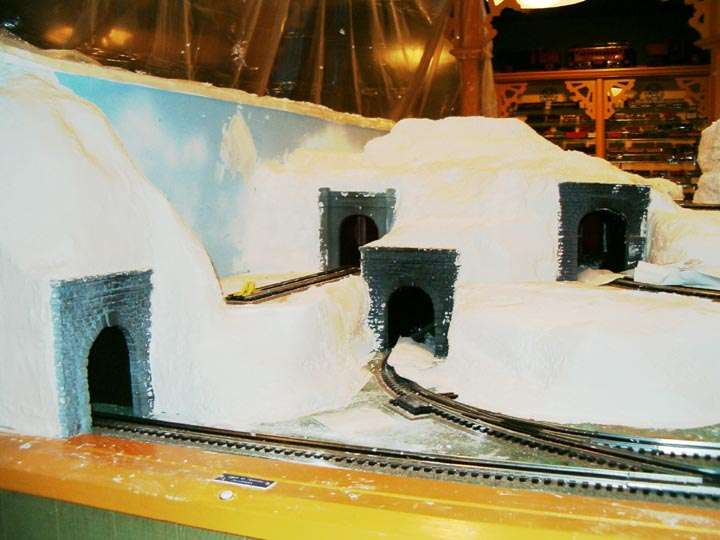
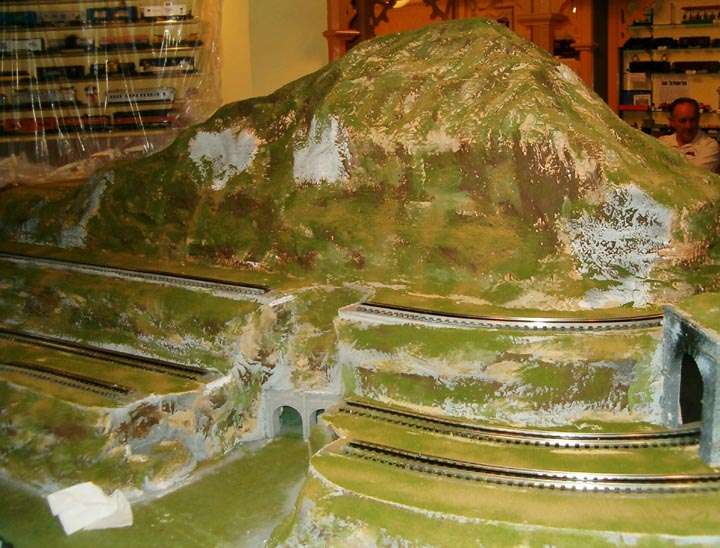
With the trackage down, but not yet checked, we began building our mountain. Of course there were lots of ideas emerging on how to progress, but those lending the greatest amount of time tend to have the most influence. We used about 20 sheets of 2” thick 4′ x 8′ pink insulation foam board. We were struggling with how to get this major portion of the project done with only four weekends left to opening. Fortunately, I knew of some folks who had performed miracles when creating an annual O Gauge layout at the B&O Station museum in Ellicott City , MD. Two of their crew took a Friday-Saturday to come up and help us with the mountain build and formation. Once the cut pieces of foam board were in place, two power drills with paint stripper attachments were used to shape the mountain. Two folks shaped while two others vacuumed up the pink refuse pieces. The single biggest advantage of using the pink (or blue) foam over the much cheaper white foam is it is dense enough to drop to the ground relatively quickly. This aids in cleanup, especially when we had displays of excellent trains only a few feet away. We didn’t need a major cleanup effort beyond the immediate work area.
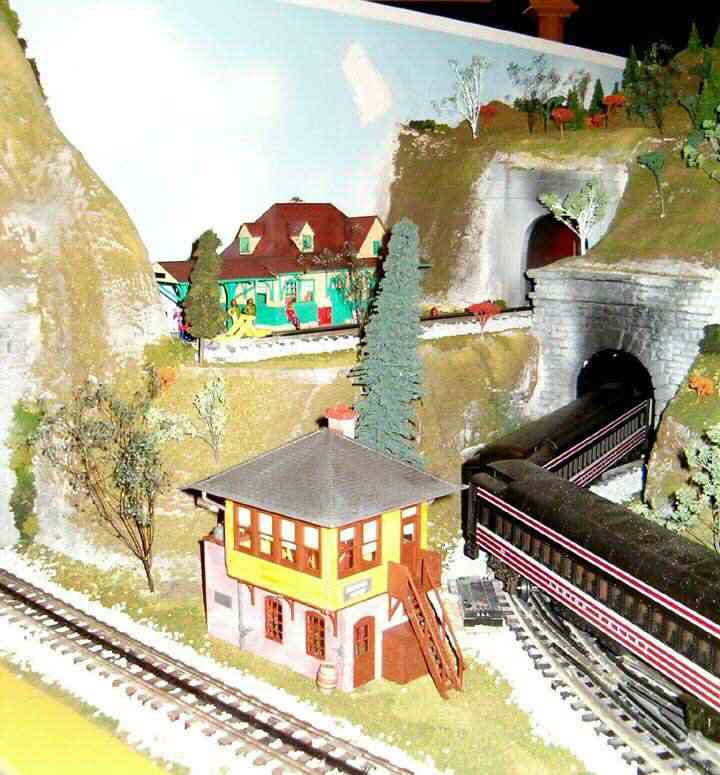
We really wanted to have some scale wooden trestles on the mountain. A couple of manufacturers seen at York were contacted, but no donations were arranged. Knowing full well that wooden trestles can really add to the visual image for a layout, three kits were procured from Hunter Line, a Canadian company, who sells to the scale model railroad market. Roughly four days were required to cut, assemble, and stain the bridges. One is over 70 scale feet long and 24 scale feet high. In addition a Lionel metal truss under bridge and an old girder bridge was weathered for the trolley line. All bridges were repeatedly emplaced and removed during the mountain construction to ensure they would fit and look good. The wooden bridges had to be out of the way during the scenicing activities to avoid covering the bridges with paint or flocking.
With the pink mountain more or less formed, we affixed the various tunnel portals for the three new tunnels, and replaced the two existing portals. All portals used were scale types and were weathered by the masterful Falling Checks creator. Next came sealing the mountain with gauze, sheetrock mud, and finally brown latex paint. The granddaughter (another Kid’s club member) of one of our volunteers lent a hand with this stage. Additional layers of paint were used to add variations in color and provide a base for the different flocking materials. A good source for paint is “mistakes” from a paint supplier; we used the local Home Depot. We are always looking for ways to stay within budget.
With most of the flocking on, the bridges on the two mountain loops and trolley line were carefully put in place. Additional flocking was applied to hide the last minute modifications required for the bridges to be put in place. By the way, if you look closely at the layout, you will see that each bridge has scale like guard rails added. Two came from GarGraves, the other two used O Scale rails glued between the outside rails from a long-ago donation.
Next came connecting the wiring below the layout and making sure all the track was working properly. This included rewiring one of the existing control panel units along with rerouting much of the accessory wiring. With somewhere around 50 solder connections to the track, we only had one cold solder joint needing attention. We sure were glad it wasn’t in one of the tunnels. Later we found that a train on one of the mountain loops would stop anywhere but in the designated stop block instead of the stop block. This was easily corrected by reversing the wiring from the control panel.
One of our members is an excellent tree maker. His many trees were added to those provided. At last count we have around 500 trees on the mountain and surrounding area. More will be added as time permits. Of course, we also added people, cars, animals, and other items of interest. This is the only portion of our O Gauge layout that has track ballast. The gray ballast was put in place using a small brush and some diluted white glue to hold it. We used three plus gallons of the stuff. The ballasters were careful to ensure the switches would still be operational for a future enhancement. Lighting was added for most of the buildings and will be completed as time permits.
For those who visited the TCA Museum during the 2005 spring grand opening on the Thursday before York , you were treated with the fruits of our labors. Are we done yet? Is any layout ever done? Nope! Like any layout, there are always some additional details requiring attention, trees to add, more lighting, and automation for many accessories (some not yet installed). Other ideas are floating around as well. As mentioned earlier, the current bypass loop on the outside track will get some relays added to allow two trains to operate on the same track but in different directions. All this work was accomplished solely with volunteers and included about a dozen folks working on and off for a short 10 weekends. Whether you made it by the TCA Museum in the spring or have yet to make it by, plan on making the trip as all layouts continue to evolve.
Earlier this year, Gary Lavinus, the Education and Museum Committee chairman of 20 years passed away unexpectedly on May 18, 2005 . He had been volunteering with the E&M Committee for 25 years. This article is dedicated to his memory and all the work and encouragement provided to this little family within TCA. Many of his visions have culminated in the excellent TCA Museum and others will come to fruition in the future. Gary you will be missed!
Volunteers Needed! If these kinds of “behind the scenes” activities are of interest to you, drop me a line or give me a call at 410-923-0754. We are always looking for TCA’ers with interest, talent, and/or the desire to learn to help out at our TCA Museum.


