Anatomy of a Cover, July 2023!
by Robert S. Butler. TCA# 78-12317 Fall e*Train 2023
Nighttime scenes, when you are doing toy/ model train photography, require more planning and testing than pictures set up with a day time setting. The cover on the July 2023 TCQ has a total of 17 separate lights (this is in addition to the dark blue flood light that provides the night time sky and a small separate floodlight for the engines), each with a different color temperature and, because of the need for giving a sense of distance, different levels of brightness.
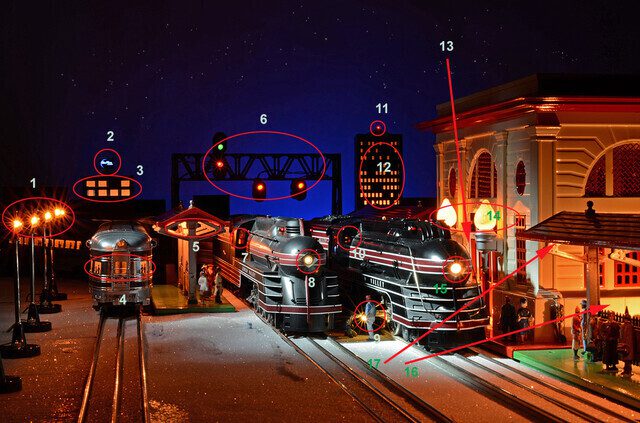
Given this variety each light (or group of lights) had its own light switch. Power consisted of all four ZW controllers set at different voltage levels, a separate transformer for the LEDs, and another transformer for the illuminated advertising sign. The LEDs are #7, 9, 10, and 11. The brightness of the LEDs meant #9 and #11 were switched on and off in about a second. The orange LEDs,7 and 10, (firebox light) were lit for about 14 seconds. The advertising sign (#2) needed 4 seconds for the best results.
The two Weaver engines have different lighting for their headlights and had to be turned on and off separately. #8 was a quick on and off of about a second whereas #15 required about 5 seconds. Lights #13 and #16 (which you cannot see) are fill lights to highlight the front and side of the station and were on for about 4 seconds. They were wrapped in masking tape to make sure their light only fell where I needed it.
The distant city lights #3 and #12 were on for 15 seconds. Lighting for #4, 5, and 6 came in at 6 seconds, The station lights (#14) were a quick 4 seconds, and, oddly enough, the near platform light (#17) needed about 15 seconds. Finally, the bank of lights (#1) was on for 10 seconds.
The only question now is where did the lighting for the engines come from? The idea is the lighting is supposed to come from the bank of lights on the right (#1) The reality is it came from a separate floodlight which consists of a Techlite with a clear LED bulb. If I had tried to use the #1 lights to do the job the picture would not have looked very good. First, all of the lights in #1 would have looked like exploding bombs on sticks and the overall illumination of the dark engines would have been, at best, very dull. Using a separate floodlight in this manner may seem like cheating but Hollywood does this all the time – just think of the movie scenes you have watched where a person enters a dark room, lights a single candle, and then very gradually the light level increases way past what a single candle light could possibly provide.
Even though the Techlite is small the spread of its beam was too broad for my needs so I made a snout out of black aluminum to further limit its spread. The total exposure time with the light was 2 minutes. I shifted the beam from the front engine to the engine in the back and then briefly to the engine fronts. When I moved the beam to the engine next to the station, I had to hold an additional piece of blacked cardboard to keep the spotlight off of the station front.
Working out all of the light level required a series of about 25 exposures. Before doing any exposures, I made a check sheet for all of the lights with a matrix of light exposure times and ran the tests using the check sheet as a guide). The drill was, pick the light matrix from the check sheet, black out the basement, set the camera on the bulb, switch on the dark blue floodlight for 15 seconds turn it off, and then run a set of exposures (turning each light on and off separately with the time based on the check sheet), turn off the camera, take the card out of the camera, go up to the computer, download the image, evaluate what I had, if something looked right, circle that time on the sheet and then go down to the basement and repeat (given the computer is on the second floor I did get a pretty good workout in addition to getting a good picture). In the end I had identified the best times for each light and set up a final exposure matrix based on what I had learned…the end result
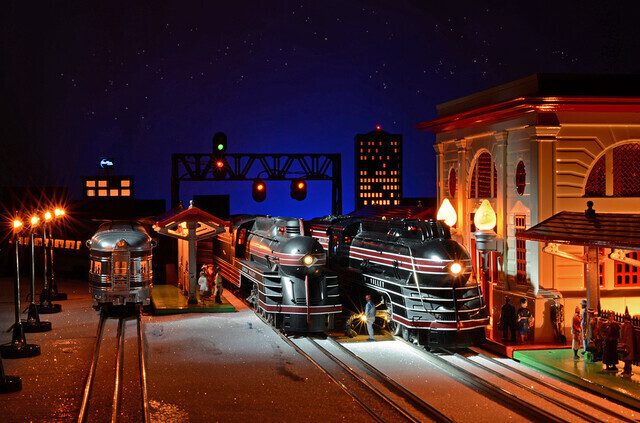
… the submitted picture
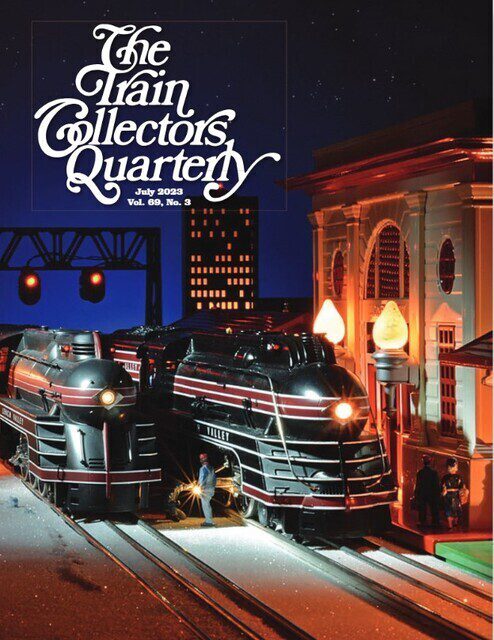
…the cover

…and the directors view of the set
P.S. The only Photoshopping are the stars in the night sky!
[email protected] | Anatomy of a Cover


